Have you ever used Windows to look for a file and found nothing? Or did you wait far too long for the results? You’re not by yourself. Windows Search’s default settings are the main source of frustration for many users.
Only specific places, such as the desktop and the Documents, Pictures, and Music libraries under “My Documents,” are automatically indexed by Windows. Different file organization may leave you waiting or prevent you from locating anything at all.
The fact that search results might change based on where you begin your search is another peculiarity of Windows. Using the taskbar, File Explorer, or the Start menu might all result in various outcomes.
Here, we’ll demonstrate how to modify Windows’ default search settings so you can locate what you’re looking for more quickly.
How to set up desktop search just right
It makes perfect sense that Windows just indexes specific file types and doesn’t index the entire hard drive by default. Otherwise, a lot more resources would be used for indexing. Numerous system files would also be returned by the search. To locate the files you truly require, you would next need to laboriously sort through those results.
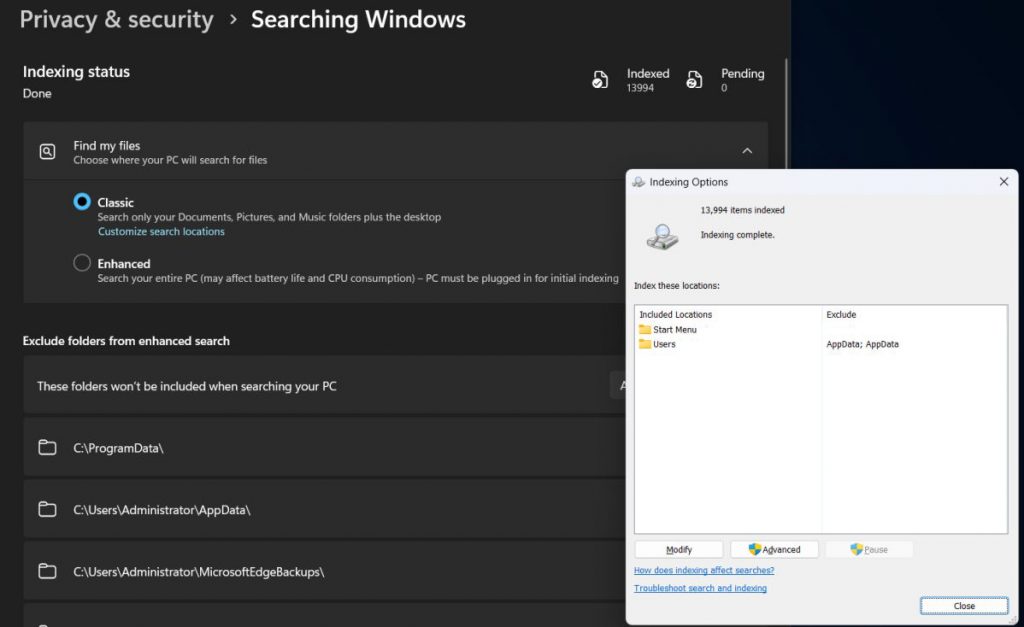
Unfortunately, that’s exactly what can happen if you carelessly activate the “Enhanced” option shown in the image above and overlook the “Search all” notice in the small print below.
That’s why, in the following steps, we’ll show you how to adjust the default search settings appropriately. The steps outlined apply to Windows 11, but they differ only slightly in Windows 10.
Here’s how it works: To customize which hard drive directories are indexed, open the Windows Settings app, click on “Privacy and security” on the left, and then click the blue “Customize search locations – Charge” link under “Classic” on the right.
This opens a window where you can use the drop-down arrows at the top to select which directories Windows should include in the desktop search.
Confirm your selection with “OK.” Depending on the size and content of the additional folders, reindexing may take up to several hours.
During this time, you can continue using your PC as normal, but the search results may not work properly until the index is fully rebuilt.
Once indexing is complete, any files or folders you add or change later will be automatically (and almost immediately) added to the search index.
Network drives and external hard drives can also be included in Windows Search in much the same way. However, it’s important to note two things: first, the drives must remain powered on or connected until the message “Indexing has been completed” appears.
Second, external drives can only be searched as long as the drive letter remains constant. To avoid problems, use the USB Drive Info utility if necessary.
By selecting the “Advanced” button next to “Change,” you can access further settings. Here, you have the option to index encrypted files, rebuild the search index in case of issues, or modify the index’s storage location.
For instance, if there is no more room on the Windows partition, you can relocate it to another partition. This is because an additional 10% of the space needed by the indexed files is occupied by the search index.
Utilizing File Explorer for more dependable searches
After configuring desktop search, utilizing it should (theoretically) be easy and efficient. Regrettably, that isn’t always true.
Microsoft provides two distinct access points: the search box in the taskbar (or within the Start menu) and the one located in File Explorer. These function in a considerably different manner.
Even though the search in the taskbar or Start menu is quick, it frequently fails to yield the expected result. For instance, even if the search keyword appears in the file name, Windows will display it only if the file’s storage path is part of the index.
The sections displayed in the Start menu — Apps, Documents, Settings, Folders, and Photos — provide minimal assistance as well. This is due to the fact that, contrary to Microsoft’s assertions, they filter based on the storage location rather than the type of file.
Thus, if you’re searching for a file stored outside the default directories, selecting “Documents” will not be useful. In the end, this search feature frequently has difficulty presenting outcomes in a coherent and organized manner.
The search in File Explorer offers more control, which in turn yields better results. As long as the open folder has been indexed for the desktop search, Windows lists everything quickly, correctly, and completely.
This also works when two or more keywords are entered. Even with hundreds of hits, you can easily narrow things down and find what you’re looking for. To do this, click either “Sort” or “Search options” in the menu bar at the top of File Explorer.
It may also help to disable the “File contents” option here.
Best alternatives to Windows Search
In terms of substitutes for Windows Search, Everything ranks among the top options. This simple tool is user-friendly, provides a useful interface for intricate searches, and accommodates a broad variety of search operators.
Everything happens quickly: as soon as you enter the initial letters in the input line, corresponding results are displayed.
Once installed, the Everything icon is visible in the bottom right corner of the taskbar. From there, you can quickly initiate and utilize the search.
The “Advanced search” feature (located under “Search”) is particularly beneficial. It allows you to restrict your search term to complete words, carry out exact phrase searches, apply either/or logic, and omit specific words, among other features.
Important: The yellow exclamation mark indicates that the tool does not search within file contents. So Everything isn’t a full replacement for Windows Desktop Search, but rather an extremely fast and powerful supplement for finding files of all types.
Tip: You can link the taskbar search field directly to Everything, replacing Windows Search for quicker file discovery.
Finally, Powertoys Run (part of the Microsoft’s PowerToys collection) allows you to search for applications, folders, and files.


0 Comments